Salesforce App Install & Admin Guide
The Corporate Gift for Salesforce App enables companies to seamlessly send, track, and automate gifting within Salesforce, offering features like mass gifting, approval workflows, full gift history, and analytics.
The Corporate Gift for Salesforce App allows companies to gift as part of their business process. Here are a few fundamental features of the App -
- Send Gifts and eGifts from Salesforce to Leads, Contacts, and Accounts
- Mass gifting - Send gifts to Leads/Contacts List View
- View Gift status from Salesforce
- Use Process Builder to automate gifting completely or create a task to send a gift
- Create an Approval Process to manage and track gifting
- Full gifting history
- Gifting Analytics - Use Salesforce reports and dashboards
- More!
Let’s Start!
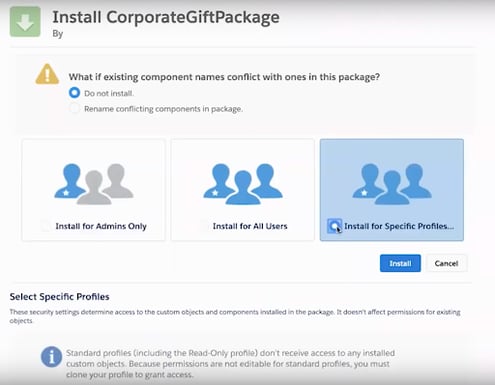
How To Install the App -
- Salesforce App package version is 2.83 (CG October)
- Production installation link: https://login.salesforce.com/packaging/installPackage.apexp?p0=04t6g000008SoB6
- Sandbox installation link: https://test.salesforce.com/packaging/installPackage.apexp?p0=04t6g000008SoB6
- Choose whether you wish to install the App for all users or certain profiles only

App Configuration
- Click on App launcher, search for “Corporate Gift” app and click on the link to open the app.

- Go to “Gifting Configuration Setup” tab to fill configuration details in “Merchant Setup”:
- Merchant Id - your Corporate Gift Account Manager will provide you with your merchant ID
- Security Header - your Corporate Gift Account Manager will provide you with your security header
- Admin Email
- Enable Gift Frequency
- Gift Frequency
- Click “Save”

- Go to the “Gift Status Configuration” subtab. Configure settings for task creation on gift order status changes:
- Create task on status change
- Enable gift status to show on Activity
- Statuses to display on Activity
- Click “Save”

- Search for “Object Manager” on the setup Quick find box and click on “Object Manager” result below

- Search for and click on “Contact”

- Click on ‘Search layout’

NOTE - You will need to repeat these steps for ‘Leads’ and ‘Accounts’ object - Click ‘Edit’ from the dropdown list.

- Assign the available buttons “Send Gifts” and “Send e-Gifts” to the Selected Buttons and Save.

NOTE - ‘Send eGifts’ is available for ‘Leads’ & ‘Contacts’ Objects only - Click on ‘Page Layout’

- Choose the layout you wish to edit. For example, “Contact (Marketing) Layout”.

- Choose ‘Mobile & Lightning Actions’
- Search for ‘Send Gift’ and ‘Send eGift’ and drag each one to the custom buttons section
- Click ‘Save’

- Go back to “Object Manager” and search for “Task” object

- Click on “Page Layouts” in the left navigation. And then click on the “Page Layout Assignment” button.

- Click on the “Edit Assignment” button. Then select all profiles where you wish to change layout. Click “-- Select Page Layout --” and select “CG Task Layout” from the dropdown list. And click on the button “Save”.

To setup automations using flows please see the following guide:
https://help.corporategift.com/setting-up-automation-in-corporategift.com-salesforce-app
![logo-circle.png]](https://help.corporategift.com/hs-fs/hubfs/logo-circle.png?height=50&name=logo-circle.png)